Category Archives: Food

MOVED OUR BLOG – FOLLOW THE UPDATED VERSION

Posted on

We moved our blog a while ago but still are getting some followers on this one. We have two blogs active. Sure would love to see you follow us on them. Here they are, links and all:

Amanda’s Bequest

Bygone Basics

We will not be posting from this blog again.

Please, Stop on over and check it all out!

And…THANK YOU for following us. 🙂

Sourdough Sally

Posted on

Hi folks.  Remember me?  I know, I know.  It has been a bit of time.  But, I’ve been here all along….. just apparently really “messy” over the holidays, as things keep falling off my plate….including this blog.  😦

Today, I’m sharing my pet with you.  Sourdough starter.  This pet (or rather these million pets, a combination of beneficial yeasts and bacteria, if you are feeling technical) is easy to keep.  You just have to remember to feed.  I call mine Sally and she lives in my refrigerator in a half-gallon blue Ball jar.

Here is Sally in all her yeasty glory.

Here is Sally in all her yeasty glory.

I have literally shared Sally by giving some of the starter to guests who had an intense interest in sourdough bread.  But since attempting to send the real thing to you via electronic signal might get a little messy …. especially for my computer … I hope you’ll be ok with sharing Sally via blog.

I’m somewhat of a sourdough snob in that I believe that sourdough bread should be comprised entirely of my own cultured yeast.  Most recipes you find these days call for part sourdough starter and part commercial yeast.

Soon, in this Bygone Basics blog, you will get a recipe for Sourdough bread.  I am giving you time to get your own pet in the refrigerator….ready to make bread.

Ever hear the old adage, “there’s more than one way to skin a cat”?  There is more than one way to start your own culture.  Some include potatoes, some take much longer…

Here’s a basic flour and water way:

  1. Make a paste with 1/2 c flour (unbleached/bread if you can) and 1/2 c water.  Loosely cover and leave at room temperature for 1 day.
  2. Stir in another 1/2 c flour and 1/c water.  Loosely cover and leave at room temperature.
  3. On the third day, it will smell a bit sour and be a bit bubbly.  Stir in another 1/2 c. flour and 1/2 c. water.  Loosely cover and leave at room temperature.
  4. On the fourth day….you may get the drill by now…. Stir in the 1/2 c. flour and 1/2 c. water.  Cover and leave at room temperature.  You should be seeing some clear evidence of the yeast “working”.
  5. On the fifth day, you should have a bubbly, fermented, pungent mass.  You have just given birth to your own Sally!  If it looks like it isn’t frothy and yeasty, leave it out another day…it could be your home wasn’t warm enough to encourage the growth in 5 days.   Once, I was making it for someone and it took about 9 days at room temperature to get a thick bubbly mass.

Another method…think “Easy Button” to borrow a phrase ….is this:

Mix 2 c. warm water (not over 115 degrees F) with a packet of active dry yeast.  Then stir in 1 1/2 c. flour.  Cover loosely and leave in a warm (not hot) place overnight.  It should be a frothy mass, but will not yet have the pungent, alcohol-ly, smell and depth of quality and flavor (some things are best taking the slow-road for).  At this point treat just as I describe above (as if it was the fifth day).  It is usable as sourdough starter and will develop the same depth of flavor and taste over time as it ferments in the refrigerator.  Don’t forget to feed her!

I just fed Sally.  I leave her out of the 'fridge for an hour to ensure feeding.  I feel better knowing my pet is alive and the little bubbles tell me she's doing just fine.

I just fed Sally. I leave her out of the ‘fridge for an hour to ensure feeding. I feel better knowing my pet is alive and the little bubbles tell me she’s doing just fine.

Regardless of how you start Sally, she will live indefinitely as long as you don’t starve her.  Her flavor will evolve based on the flours you use and even the wild yeasts that are present in your environment.  She will become, one of a kind, YOURS over time.

You can now make bread with her.  It is time to store her in the refrigerator.  She’ll live in there for 7 to 10 days.  Then, if you haven’t used some and refreshed her, you need to feed Sally.  Just take out a cup of the starter to make room for the “feed” and add in a 1/2 c. flour and 1/2 c. water (sound familiar?)  Every 2 or 3 feedings, I add a tablespoon of honey; and swap the white flour for whole wheat or…another flour every several feedings….but that’s just what I choose to do.

Do you make sourdough bread?  How do your techniques/recipe for starter differ?

Just don’t forget to feed her every week or so…

“I would say to housewives, be not daunted by one failure, nor by twenty. Resolve that you will have good bread, and never cease striving after this result till you have effected it. If persons without brains can accomplish this, why cannot you?” –’Housekeeping In Old Virginia’ Marion Cabell Tyree ed. (1878)

 Soon…..a nice recipe for bread using Sally and no commercial yeast.

To really add depth of learning and wonderful memories, you can come the our heritage kitchen here at Bygone Basics to learn heirloom  bread-making hands-on…and/or many other heritage home arts… http://www.bygonebasics.com.  You can even stay here at our immersion bed and breakfast!  www.amandasbequest.com

Amanda – The Green Chemist & her Den Adel Community Garden Project

Posted on

A guest blog – by Daughter, Jessica.

My daughter, Jessica, is one of my kitchenaire assistants.  I have been known to lovingly and in great fun, call her a scullery maid.  Jessica is in the U.S. Army and a tough gal who speaks Russian.  No scullery maid she.  She is however, a study in conflicts.

She is a pretty, little pixie looking girl – but tough as nails.  She is traveled, even living in Kiev in the past – yet enjoys the small town peace and character.  She has a degree from MSU in Russian and possibly seeks deployment into scary areas of the world – yet happily dons a “Fetching Apron” and becomes a scullery maid for a day.  She reads War and Peace – but is currently helping me write a humorous cookbook.

So….that was a long intro….but I wanted you to know the author.  She writes about Amanda (and Kyle) who have gone from learning from me at Bygone Basics to create a phenomenal project.  At our first session, I actually asked Amanda if she knew how to pare an apple.  (she did)  My comments are italicized in red (my favorite color):

Bygone Basics was sad to lose Amanda Goudreau, but we all must grow up. Amanda was a celebrated Kitchenaire
Assistant in the days when Bygone Basics was still young and living in the suburbs of Whitehall, MI. (Amanda was my “scullery maid” for a long time and helped me build Bygone Basics into what it is and dreamt the dream of Amanda’s Bequest B&B with me as well.  She seems to think I named it after her!!  I am forever grateful for her friendship and assistance). After marrying Kyle, who had just arrived back home from Iraq, (his absence nearly drove Amanda….and those of us around her …CRAZY.  We are so glad he’s back and safe.)  the couple moved to Kalamazoo to attend the university there. To Mom, (Valerie) it must have seemed like one of her chicks was leaving the nest, but I knew that it meant the ideals Bygone Basics was founded on was simply spreading to a new city. And how right I was! ( I really tried hard to talk them into giving up the silly notion of attending University 😉 and having them buy a farmhouse just down the street….)
Kyle and Amanda Goudreau are excited to announce the opening of their community garden. There is a hideous, vacant half-lot directly next to their new house, and a condemned house on the other side of that. Why not make good use of it? If all goes well in their endeavors for the next couple of months, they will be able to use that plot of land to start a community garden….and hopefully they will even be able to remove the mostly-dead tree that stands smack-dab in the center of it. Currently, they are still in the planning stages, but the more community support they gain from the start, the easier it will go for them. Luckily, they already managed to find a supporter willing to fund 100% of their project, and to also help out with any legal matters that may need attending to. (I’m not going to lie, I fought a tear when I watched them find out they weren’t fighting an uphill battle alone.)   We were/are SO PROUD of them.

Amanda.

Local people will be able to secure a plot for a very small fee, which has yet to be decided, and will be provided with every opportunity to be successful in gardening their plot from the very beginning. They are also hoping to get some chickens for the garden, so that local children will be able to hunt for eggs, and will have a better understanding of where their food comes from, in all it’s forms. In addition to the garden, itself, Amanda and Kyle will be hosting several workshops, about one per week. They will, of course, be free to attend, and will cover such topics as: drying out seeds and saving them for the following year, vermiculture – composting with worms, animal husbandry – mainly with raising and breeding chickens and rabbits, and plenty of generic ones about gardening that will be immediately applicable on the plot.  (Understand that this isn’t just a pretty pipe dream.  These two Goodreaus are outstanding and intelligent young people – Amanda is in the Chemistry field and Kyle is studying Medicine.  I have zero doubt they will make numerous impacts on the world as they proceed through life.)

Any surplus crops from the community garden will be donated to local food pantries. The over-arching mission for this project is to promote community cohesiveness, and to improve the surrounding area through inspiration.

Jessica wrote this blog a few weeks ago….(yes, Jessica, I know, I know….it took too long for me to post!  But at least now I can add this good news follow-up…)  A follow-up note from Amanda tells us:

“Well guys, we did it. We’ve been given the green light for the Den Adel Community Garden Project. There are a few last legal details to iron out but we should be breaking ground before the end of the month. That gives us just enough time to get the tree removed, lay the beds, and get a fence up before the ground freezes.”  

There may have been occasional silliness occurring in the Bygone Basics kitchen (with Valerie Hanson, Mary Lynn Rabe, and Amanda (Putnam) Goodreau

If you are in or about the Kalamazoo, Michigan (USA) area and wish to be a part of this very neat project, let me know and I will put you in touch with Amanda.

Do you have a desire to learn some of these progressive AND retro (talk about conflicting words) skills (gardening, canning, baking, raising chickens/ducks, soap making, butter churning, composting…etc)?  Come visit Bygone Basics at Amanda’s Bequest!  Heck….you can even stay here while you learn (true immersion).

CONGRATULATIONS AND GOOD HARVEST WISHES TO AMANDA AND KYLE.

Jade Jam

Posted on

Hi all.  This week’s Bygone Basics’ blog is very special.  Jade has taken what she learned here in our kitchen to her home kitchen and gone crazy making jam.  She then “infected” her Mother-in-Law, Debbie, with her jam-making and now they do it together.  Next in her sticky wake she wrote notes and took photos.  Be still my heart.  I LOVE to hear of stories like this.  Here is Jammin’ Jade’s story as she sent it to me. (there may have been some notes added by the editor in the interest of fun…darned editor) 😉  Jade’s words are in green (of course).

The rule is, jam tomorrow and jam yesterday – but never jam today.  -Lewis Carroll 

Today, Debbie  and I made Caramel Apple Jam. If it weren’t for you, Valerie Hanson, this never would have been able to happen. I took the liberty of sending pictures that I have taken and hope that my notes come across. It was a lovely bonding experience for us and I’d like to take this opportunity to say thanks to you. So, thank you.

You could thank me with a little jar of that jam. CARAMEL APPLE, nice. But seriously….You are most welcome….THANK YOU!

First we peeled, cored and sliced the apples.

We made sure to have washed and sterilized jars on hand.

We pre-measured (yay) the sugar, brown sugar, lemon juice and butter (to stop the foaming). This is of course so that we had exactly what we needed the instant we needed it.

Someone was paying attention!! I bet they were exact measurements too, so the jam “sets” like it should….

Then Debbie diced the apples into small pieces. Then put the apples, lemon juice, apple juice and butter into a pot to boil.

Mother-in-Law was made to do the tedious job of processing the apples? tsk tsk.. 😉  Guessing that Jade is doing this while her little girl is napping (taking note of the monitor).

After it came to a boil, we turned the apples down to a simmer for 5 minutes while covered. Then we added the brown sugar and sugar very carefully and a bit at a time. Making sure to stir until it was all blended.

After it had came to a rolling boil we added the liquid pectin. Having already prepped the package for use. lol

Standing it in a glass is handy.  It IS very disappointing to reach for the envelope of pectin at the proper time only to discover that it has slid down from where it was leaning and the pectin escaped all over the counter.  Don’t ask me how I know this….

Then after it started boiling we waited one minute before removing it from the stove.

Then Debbie put the jam into the jars while I checked the amounts. Then they were wiped on the tops (where the rubber meets the road…hahahah) and sealed with the lids and rings. We both turned them just to make sure there was no leaking problems.

I hate it when my problems leak…

Here is what it looks like pre-lids.

Then the sealed jars were put into a water bath for 10 minutes.

Then the jars were removed and put onto a wire rack to cool until tomorrow. Then we will wash the jars, label and store. This was extremely simple to do. As for the blue duck, it isn’t required. My daughter Beth kept handing it to me. Presumably it is for good luck. I can only say that when I sampled the jam it was really good. 🙂

We all should have a blue good luck canning duck.  (must be Beth got up from nap-time mid-jamming)

Here is Jade at Bygone Basics….

Schedule your jam session at Bygone Basics.  What better time than food, friends, fun?

What treat this has been. Thank you Jade and Debbie

….and blue good luck canning duck.

Better than Wedding Cake.

Posted on

Gather ingredients and tools. It is such a disappointing feeling to get part-way through a recipe only to discover you don’t have everything you need.

I think I may have a serious addiction. Pumpkins. They really do capture my attention as they are the source of the pure goodness known as: Pumpkin Pie.Welcome to the second part of the pumkin series.

I love pumpkin pie.  I could eat it morning, noon, and evening meals….and the occassional 1 a.m. kitchen raid.  In fact, when we married, I didn’t want a fluffy, fancy wedding cake.  I wanted pie.  🙂  The bridal cake was a pumkin pie, in case you wondered.

“Pumpkin pie, if rightly made, is a thing of beauty and a joy – while it lasts…..Pies that cut a little less firm than a pine board, and those that run round your plate are alike to be avoided. Two inches deep is better than the thin plasters one sometimes sees, that look for all he world like pumpkin flap-jacks. The expressive phrase, ‘too thin’, must have come from these lean parodies on pumpkin pie. With pastry light, tender, and not too rich, and a generous filling of smooth spiced sweetness – a little ‘trembly’ as to consistency, and delicately brown on top – a perfect pumpkin pie, eaten before the life has gone out of it, is one of the real additions made by American cookery to the good things of the world. For the first pumpkin pie of the season, flanked by a liberal cut of creamy cheeses, we prefer to sit down, as the French gourmand said about his turkey: ‘with just two of us; myself and the turkey.'” –‘The House Mother’

So this blog post is a follow-up to the last one.  If you remember, we baked pumpkins and saw how easy it is to get to the point of making a pie.  (I’m sure you rushed right out and cooked up pumpkins yourself!)

Pretty nice ingredients. Our free range hen eggs, milk from a local dairy, pumpkin from our garden…mmmmmmm

As I type this, I probably should have done a post on the pastry, but oh well, forward motion.

Pumpkin pie is pretty easy too.

Find your recipe.  I hope you’ll consider sharing your favorite one with me in the comments!  I use one that has become my favorite.  It requires simple ingredients….(no milk product from a can).  Now, gather your ingredients.

Two basic rules that will really help you enjoy your time in the kitchen is to prepare (premeasure, make sure you have everything) and clean as you go.

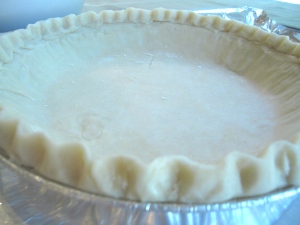
One pie pastry. Line the tin, forming the pastry to the pan. Flute the top.

Line your tin with the pie pastry.  In these photos, I’m making a smaller pie that will be gifted to a friend so it is in tin that she doesn’t have to get back to me.

Whisk all the dry ingredients together in a medium sized bowl.  This such a great recipe for requiring very few tools and bowls.

Now is time for the wet ingredients.  But first…Did you preheat that oven?  I frequently forget so thought you might like a reminder too.  A couple of comments on how I do things.  You might do them differently, but am sharing them anyway.  I bake my pies on a foil lined cookie sheet to catch drippings.  I also bake my pies in the lower part of the oven to direct the heat right onto the bottom pastry so it bakes before getting too soggy.

Add the wet ingredients.  With Pumpkin Pie, the usual suspects will be milk, pumpkin, eggs, extract.  But your recipe may differ.  It is really important to get the eggs thoroughly whisked into the filling.  If they are not incorporated well, you will have bits of egg white visible in your baked pie.

I whisk the eggs and pumkin in first. Taking care to get a good blend.

Place your pastry lined pie tin on the cookie sheet now if you are going that route.

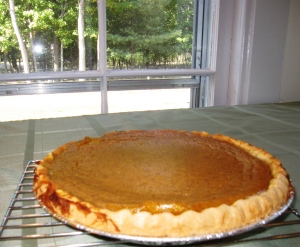
Now, pour into the pastry lined tin and pop into the oven!  Be sure to double check your recipe for baking time.

I line my crust with foil to prevent overbrowning and to help support the pastry until it bakes some. It is so sad to discover your crust gave way and the filling poured out!

VOILA!

The recipe:

3/4 cup Brown Sugar             1/2 tsp Salt

1 TBSP Flour                            3/4 tsp Ginger

1 tsp Cinnamon                       1/2 tsp Nutmeg

1/2 tsp Cloves                          1 1/2 cups mashed cooked Pumpkin

3 Eggs                                       1 1/2 cups whole Milk

1 pie tin lined with pastry

Bake at 400 F for 50 minutes

WHAT IS YOUR FAVORITE PUMPKIN PIE RECIPE?  Does it have a family history?

Holy Cow

Posted on

Holy cow, it has been a very eventful summer.  My apologies to you for a prolonged absence.

We have had twin grandaughters and a grandson born.

We have also learned of another grandchild on the way, and were saddened by the loss of a grandbaby-in-womb.

Our garden has been prolific lately, but as a result of much tending and watering due to the extreme high temps this summer and drought.

Our bed & breakfast, Amanda’s Bequest Bed & Breakfast, in here in Montague, Michigan  www.amandasbequest.com  has been busy.  Certainly for its opening year!  We operate as a farmstay and guests are immersed in a real working farm-stle home.  They collect eggs and can help churn butter or gather food from the gardens for breakfast if they wish.  We have enjoyed many wonderful and diverse guests from all over the world now!!  (How cool is that?!)  One guest, who was a world traveler, rated us as top two B&B’s in all his travels.  Turns out I’m I’m an ok cook.  He couldn’t decide who was better, a B&B in Scotland, or us.  I have to tell you, I was so dumb-struck at the remark.  After all…we are just..us.

Also busy for us has been our Bygone Basics culinary experiences.  www.bygonebasics.com  People are really wanting to know how to go back to the healthy nutritious foods that were on our predescessor’s tables.  I teach them how to use what tools they already have to get that heritage “kitchen is the heart and soul of the home” healthy foods back into their lives and in their “today” lifestyle.

We have had kitchen guests from 7 countries and 44 USA States now.

To top it all off, I’m now a licensed kitchen and am baking and selling heritage recipe and artisan foods.  All made to order and by hand from natural foods and basic ingredients (nothing you can’t spell or say!).

We have grown our little flock of hens from 6 to 12…plus a duck…but don’t tell Daisy, she thinks she’s a chicken.

My loving husband has been amazing as our journey has brought us to this kind of activity.  He just smiles and builds what I need.  🙂  I wish this kind of a husband on all of our daughters.

Anyway….

My niece Jade is now “apprenticing.”  Leaving me with a few hours at the end of the week to blog and do other things that I’ve been too swamped to do.  I taught her how to hoe the other day.  I told her she was going to be a great hoe-er someday.  She laughed.  I realized what I said.  Too funny.  She’s been learning to bake, make pies, artisan breads, hoe, can, make soap…she’s been a treasure of help to me too!

I will “talk” with you soon.  Just needed to catch you up on my busy-bee “holy cow, what changes!” summer.

Yours,

Valerie Hanson

Twins!

Posted on

I have been “off-line” lately due in part to the immanent birth of our daughter’s baby.  (And that cooking & canning classes have really booked me up, along with our bed & breakfast.  I am pleased to announce the birth of twin granddaughters!!  Photo to follow soon.

A Sprung Spring

Posted on

See the plant nursery in the window? Pretty nice “digs” for them, if you’ll pardon the pun.

We try to use as much space as possible for planting. Even vertical shelving and mismatched planters. Soon the pots and shelves will be screened by moon flower and morning glory vines.

Rhubarb!! A seriously under-used food plant.

One of the lucky pepper plants that survived the greenhouse demolition. We don’t really know which of 4 varieties if may be!

Finally!  I got to plant my garden.  It has been a crazy spring.  80 degree March and 30 degree April.  Wind heavy storms.  I happily started seeds in the parlor windows in mid February so my little pretties would be ready to transfer out to the big outdoors greenhouse by mid to late March.  The weather was so nice in March, I was pleased to re-pot the now leggy tomatoes, ground cherries, and peppers, etc. and haul them all out to the sunny warm shelter of the outdoor greenhouse.

That’s when it started.

The Crazy Spring.  It was like Spring sprung a spring and went bouncing off its track.  The weather didn’t just turn cold, it turned frozen with night temperatures plummeting to 23 degrees and daytime ones nudging 40 and 45.  Certainly not growing weather.  I took to hauling the many flats of plants back into the house at night and then, out to the greenhouse by day.

Eh…it’s Michigan.

That’s what I told myself.  You do what you have to, to garden in Michigan springs.

Then, it warmed up a smidge and I let the plants have a sleep-over in the outside greenhouse.  That’s when disaster struck!  Fantastical high winds.  They arrived as if on a freight train and demolished my greenhouse and spilled my lovelies all over.   Broken stems and dashed harvest.  I did my best to find and re-plant what I could and hauled them back into the parlor to stay.  Then, fortunately, I had more seeds, I started new plants.

Here is a young row of strawberries interplanted with asparagus. In normal years, the asparagus would be much shorter! Plus, it has been left to grow healthy roots instead of stalks this first year.

That is one of the great things about starting a garden with seeds instead of nursery plants.  Extra seeds.

Well.  I finally got my gardens planted.  The recovered older plants are in the ground with smaller ones.  Rows of seeds are now sprouting into red trails of beet leaves and fine tendrils of newly emerging green onions.

There’s cabbage, broccoli, rutabaga, potatoes, carrots, onions, garlic, horseradish, sweet corn, peas, beets, ground cherry, squashes, beans, pickles, lots of herbs, nasturtiums, sunflowers, morning glories, marigold….and lions and tigers and…

Beets make a pretty row of red and green. My how the chickens love the little ones I pull out to thin the row.

Already in the ground were the perennial plants.  Strawberries, Asparagus, Rhubarb, Onion, Garlic, Blueberries, Raspberries, Currants, Apples, and Pears.  I’m loving my rhubarb harvest right now.  Couldn’t pick the asparagus as it was planted only last spring and it is best to give it a year or so without harvest to let the plant focus energies on the root growth.  The first crop of strawberries froze off but there’s more on the way.  We surely lost the pears and apples to the Crazy Spring.  I’m also getting lots of spring perennial herbs and the onions that make our food practically dance with flavor.

I can’t wait to start canning season.

I’ve been teaching a lot of canning lately and it is certainly the season

Herbs! Oregano and tarragon in front. Planted area for basil and cilantro next. Then, fennel, lavender, lemon balm, pineapple sage, dill, chives…

for canning pickled asparagus.  Bygone Basics guests enjoy taking their green jars of treasure home.  Now it is my turn.  This weekend…I’m canning as much as possible of this neat treat…for ourselves and our guests.

After that…Jam!…of the strawberry rhubarb varieties…and then…summer produce will be in full swing and all harvest will break loose.

What is your favorite food to grow?

What do you look forward to “put by?”

We grow things in the ground and in pots and buckets….here is some basil that will flourish in vertical space.

A newly “grounded” plant. It had just been rained on so it looks a tad bedraggled.

NEATO!

Posted on

How neato is this?  kalamitykelli nominated me (icanatbygonebasics) for the Versatile Blog Award.  It sure added a thrill to my day as I was over focused and drenched in paint doing a project (hand-painting a sign for our B&B).

Thank you kalamitykelli.  🙂   (http://kellisretrokitchenarts.wordpress.com/)

As a VBA recipient, I should tell you 7 things about myself:

  1.  I have 8 children (6 daughters and 2 sons), 2 grandsons, 1 baby grand son due in August, and TWIN baby grandgirls expected next month!
  2. I can move my eyes independent of each other (makes me look rather loopy!)
  3. I just opened a heritage farm-stay Bed & Breakfast (www.amandasbequest.com)
  4. I garden every open square inch possible….vertical and horizontal (I have peppers and tomatoes stuck everywhere in the summer)

    This is what I've been doing. Hand painting a sign for our Bed & Breakfast. I covered in paint and am told by my husband that I must roll in paint like a horse in sand. http://www.amandasbequest.com

  5. I am a crazy chicken lady (love my free range “girls”) and they follow me about like ducklings
  6. I teach heritage culinary and farm kitchen skills (soap making, pressure canning, gardening, baking breads and pies old-style…etc) in a 140 year old kitchen (www.bygonebasics.com)
  7. I have a novel pacing across my brain and back, rattling its cage, wanting to get out….

Here are 15 versatile blogs I enjoy (no particular order):

1.  The Soulsby Farm (http://soulsbyfarm.wordpress.com/) who believe in the same lifestyle I do of self- sustainable living and are random bloggers so you get a wonderful view of their lives.

2.  Jen Maan in Amman (http://jenmaaninamman.com/) an ex-patriot from Southern California who is currently in Amman with her husband.  Her blogs are humourous and cultural diverse…and have some interesting recipes too!

3.  Kath Usitalo (http://kathusitalo.com/) has a couple of blogs and a great writing style…and she’s continuously visiting interesting places and sharing them in her blog with great photography too.  You never know what she’s going to share next.

4.  In Toads Garden (http://toads.wordpress.com/) is a wonderful gardener in Denmark with a very natural earthy style that I enjoy.

5.  Yes You Can (http://yes-you-can-can.com/) is a wonderful country girl’s guide and covers sewing, cooking, gardening…lots of basic “how to’s”

6.  thesolitarycook (http://thesolitarycook.wordpress.com/) is all about FOOD!  She knows her stuff and clearly loves the enormous variety of foods she writes about.

7.  wallopingteaspoon (http://wallopingteaspoon.wordpress.com/) is also culinary pro in my book.  Her blogs are thorough and well written.  She blogs about food from tuxedo cupcakes to a good “sammich” to Red Snapper

8.  Rosey Dow Blog (http://roseydow.wordpress.com/) I like her old house blogs and feel an affinity.

9.  hippie itch (http://hippieitch.wordpress.com/) covers a lot of topics from healthy lifestyles to food to animals.  I love her passion for animals.

10.  The Domestically Impaired Guide to Retro Kitchen Arts (http://kellisretrokitchenarts.wordpress.com/) is a great blog on home canning…a KINDRED SPIRIT.

11.  Aquaponic Family (http://aquaponicfamily.wordpress.com/) is a fun blog about aquaponic gardening.  I live vicariously through them as I would like to do what they are….

12.  Farm Country Crafts (http://farmcountrycrafts.wordpress.com/) Pretty well described in the title but goes much further!  A fun blog and you’ll love her Five Reasons to Do Yard Work in the Shade.

13.  domesticateddilettante (http://domesticateddilettante.wordpress.com/ is a well-written and well-rounded blog about family, food, gardening… I love that she is determined to garden.

14.  The Cosy Creative (http://thecosycreative.wordpress.com/) is about a lot of things.  I really like her motto “feel happy, make something”

15.  Linda Stone (http://lindastone.net/) is a thinker and able to transmit those thoughts with good clear writing.  What can I say, I like thinkers!

Keep up the great posts!  And thank you for sharing parts of your lives with me.

Valerie Hanson


The Outhouse Was Good Enough For Grandma…

The outhouse was good enough for Grandma, shouldn’t we still be using them then?

Lately, it seems that nearly every time I tell people what I do at Bygone Basics, a common comment is made by someone in the circle of conversation.  “Oh, my daughter-in-law (or whomever) wants me to teach them how to can.”  Of course that piques my interest and I ask about what they’ll can and which methods they’ll use.  Almost always, the response is peaches or tomatoes to start with and they use the same method that has been in the family for a few generations, open kettle.

If I’m beating a dead horse I do not apologize.  I know I’ve touched on this subject before.

I cringe when I hear open kettle or water bathing vegetables, or many other dangerous methods.  Open Kettle refers to a pot on the stove of the product to be canned, boiled, and then pour hot into clean jars and lidded with no following water bath or pressure canning.  When I let the person know that open kettle is not a safe canning process AND ALSO that meat, poultry, seafood and vegetables should ALWAYS be pressure canned (not water bath canned because water only boils at 212 degrees so the food product never gets hotter than that), the next (sometimes indignant) comment is as predictable as the one that led to it….

 “It was good enough for Grandma, its good enough for us!”

Let’s explore that comment.  Why?  Because I need to get this off my chest as I’m going to explode the next time I hear it as a reason to pass along outdated and unsafe actions.

    • Grandma used an outhouse, the sears catalog for toilet paper, and probably didn’t have a sink with nice hot water and antibacterial soap near it either.  It was good enough for Grandma….how about you?
    • Grandma (and Grandpa) butchered the hog and hung it to dry or cool.  Did they hang it in the clean USDA certified cooler or smokehouse?  No.  That didn’t exist for most homes.  This too, was good enough for Grandma…..would you be ok with this meat today?
    • Grandma got her water out of the ground and used it as it was…..how many plastic bottles or purified water have you consumed or given your family lately?

Home canning is a versatile heritage art.

My point isn’t to suggest that someone is taking the easy road.  My point is that:

Grandma did the best she could with the equipment and the knowledge she had, shouldn’t we? 

Science has come a long way in the last 75 years.  Botulism isn’t the only organism to be concerned about, but it is a VERY serious one.  We now know that botulism actually only grows in the absence of oxygen.  So when a person does an open kettle canning process, they are creating a bit of seal on the jar, but the product inside never reached the temperatures necessary to kill organisms if they were present.  (botulism is killed beginning at 240 degrees F.)  The perfect environment to grow a nice bit of toxin.

How do we know that no one ever got sick from her home food preservation methods? Back then did we do a state-of-the art autopsy on every death?  Did anyone ever just get sick? How do we know it wasn’t from the food they ate hours prior?

I’m sure many, many jars of home canned food was just fine from Grandma’s kitchen.  It was tasty and nutritious.

Were they all?  Probably not.   Why wouldn’t we make the most of science and today’s advancements to make our home prepared foods as safe as possible?

For more information from the USDA on updated home canning recommendations check out this link:

http://www.csrees.usda.gov/newsroom/news/2011news/home_canning_guide.html

For other comments on canning safety, check out the Bygone Basics August 2011 newsletter:

http://bygonebasics.com/web_documents/bygone_basics_i_can_news_august_2011.pdf

You can find more information on safely learning to can and read other newsletters at www.bygonebasics.com

Spiced Beets, canned in the Bygone Basics kitchen.

Of course, I’d like you to come to Bygone Basics to learn about safe home food preservation while having a fantastic heritage culinary experience in an 1874 home.   As always, thank you for preserving your heritage through food and fun….because …. You CAN.  🙂